 NIXIE CLOCK DIY
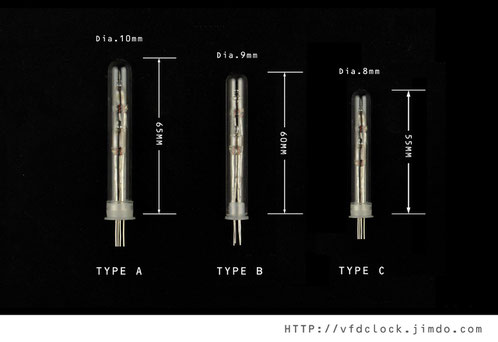
Currently we have more types of the difference size of the glass tube,you can select the size which fits your clock.
Tube Size:
[TYPE A]: Glass part Size: 10mm(Dia.)*~65mm(Height)-(~8mm(Dia.) inner); The plastic plug is plugged
outside the tube;
[TYPE B]: Glass part Size: 9mm(Dia.)*~60mm(Height)-(~7mm(Dia.) inner); The plastic plug is plugged inside the tube;[TYPE C]: Glass part Size: 8mm(Dia.)*~55mm(Height)-(~6mm(Dia.) inner); The plastic plug is
plugged outside the tube;
With plastic plug under the bottom of the tube;
How to make it by yourself:
![This is [TYPE C] dia.8mm*55mm(H)](https://image.jimcdn.com/app/cms/image/transf/dimension=590x10000:format=jpg/path/sb03fefd490221d21/image/i7d0122d9675ac98e/version/1452865523/this-is-type-c-dia-8mm-55mm-h.jpg)
Here is the stuffs you need:Glass tube,Plastic plug,NE-2 neon indicator lamps,Clear heat shrink tubing,2 LEDs (need its' hard legs).
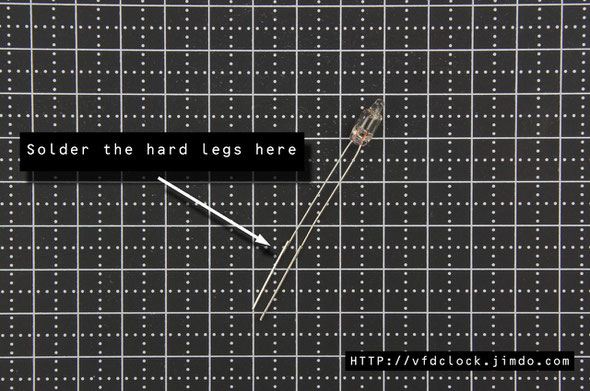
Cut the led legs off,then solder it on the bottom of the neon lamps.In this case,keep the first neon lamp's leg no cut.

Cut the the other neon lamp's leg a little bit short,then solder the led legs on it.

Plug the clear heat shrink tubing on each legs,then heat to shrink it. keep the shrink tubing long enough to cover the soldering part of the connections,but no need to cover all of the legs.

Prepare the plastic plug,mark the drill points out on the surface,recommend 2.54mm (0.1") gap, or you can make your own decision.
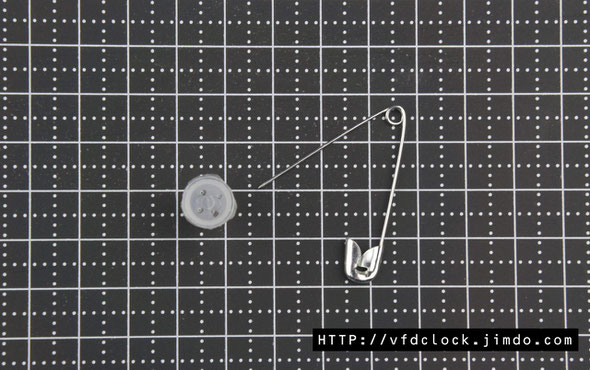
Drill 4 small holes with the tools you have,it's easy,small holes will be fine,no need to drill the big holes.

Plug the Neon lamps inside it.

Plug the neon lamps leg in a big foam, and adjust the location of the lamps.

If you feel necessary,you can fill the epoxy or other stuffs in the plastic plug,adjust the lamps again to make sure it fits your request,then plug the glass tube on it.We use the 3M 5 minutes epoxy which works fine. It's an optional step,if you wanna solder it directly on the PCB,we recommend you fill the epoxy.

Plug the glass tube in the plastic plug,the job is almost being finished.

If you find that the plastic plug is too long, you can use a knife to cut it short,just press the blade down the location you wanna cut,then rotate the whole tube. If the plastic plug has skirt on the bottom side,just put the skirt part outside the edge of the table,then do the same round cut.

After been cured, you can remove the no need part off the glass tube.

Here is the result.
You can use our through hold female socket pins to install it on the PCB,just cut the outside legs bottom sharp,and leave ~1cm length legs.it will stander there like a tree,and if you did not glue it,you can adjust the location of the lamps and replace the glass tube in the future.
TIP:
For the outside plastic plug ,after you glued with the epoxy,and till the epoxy be solide,if you wanna remove the plastic plug you can cut if off easily with the knife,or you can place a little bit of the vaseline on the inner side of the plug then add the epoxy,can be easily to remove the plug later.

You can use different color of the epoxy like transparent or black,and you can paint the glass tube into red if you need.

Write a comment